How to create a multilingual Joomla website
Joomla is the CMS that has the most languages supported
This article will guide you on how to build a multilingual Joomla website step by step.
Step 1: Check which languages are currently Installed
1. Login in your Joomla administrative panel, go to Extensions -> Language(s) and click on Installed.

Frontend languages - Site indicates the language Joomla! uses in the frontend.
Backend language - by clicking on Administrator you can see what language is installed for the backend.

Step 2. Installing a new language
Add the language files for the language you want to use on your site in two steps.
1. Install the language package
Click the button at the top left Install Language.

A list of available translations is displayed, find the desired language and click the button Install. For this guide, I have installed Bulgarian as an example.
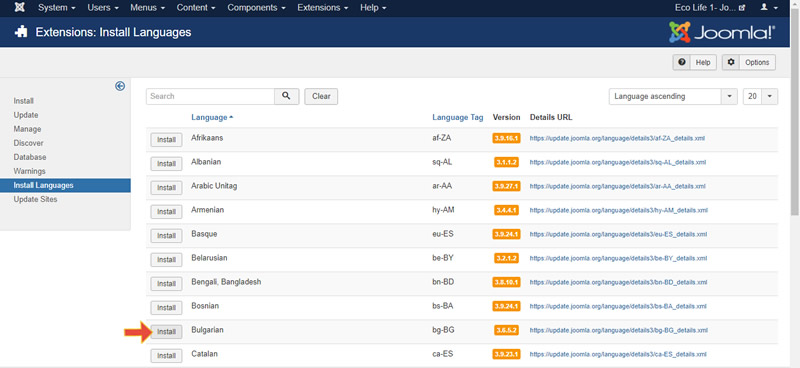
Then, a message is displayed "Installation of the language was successful" and you can see now that your new language is available.
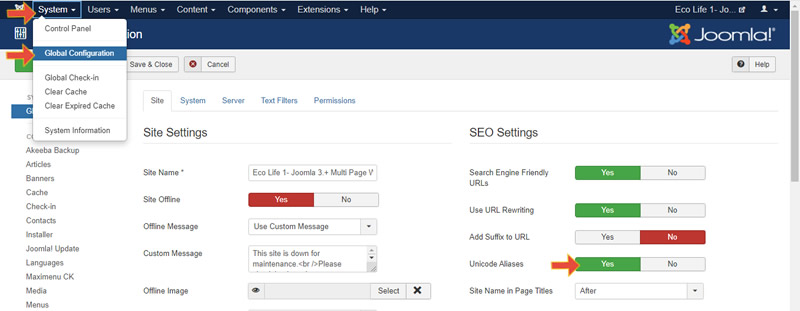
Note: If you install a new language that contains special characters as the Bulgarian language, you will need to enable Unicode Aliases. Go to System -> Global Configuration -> Enable Unicode Aliases.
2. Tell Joomla! that you want to use it as a content language.
In the Language Manager screen, click on "Content Languages" in the left sidebar and you will see the Content Languages available. To be able to use the newly installed language you must change its status to "Published" by clicking on the "X" icon in the Status column).

Setup 3. Enable System - Language plugins
Go to Extensions -> Plugins. In the Search field type "System - Language" and click Search. Switch the Status of System - Language Filter and System - Language Code to Enabled.

Language Filter plugin - by default, try to detect the language settings of the visitor browser and display the website in this language.
Language Code plugin - to improve SEO, Joomla comes with a built-in language code plugin, which provides the ability to change the language code in the generated HTML document.
Step 4. Create multilingual content
4.1. Create a new category for each language
Go to Content -> Categories -> Add new Category
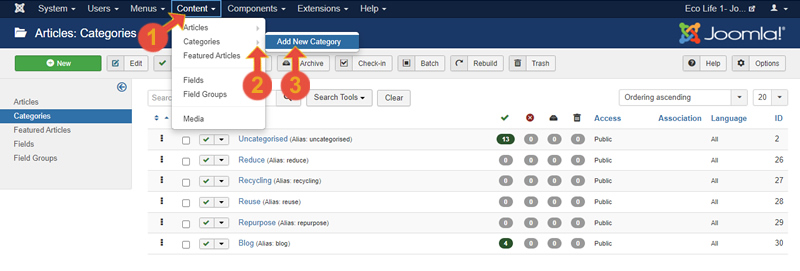
Insert the Title for the specific language, in the Language drop-down change to Bulgarian and Save & Close.
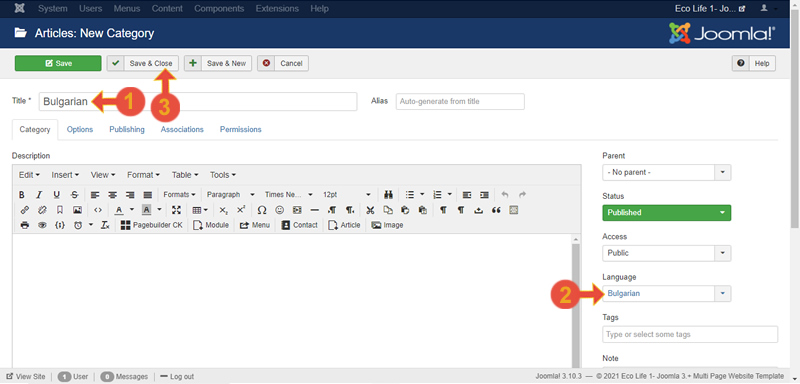
Repeat the above steps to create an English content Category.
4.2. Create articles in each language
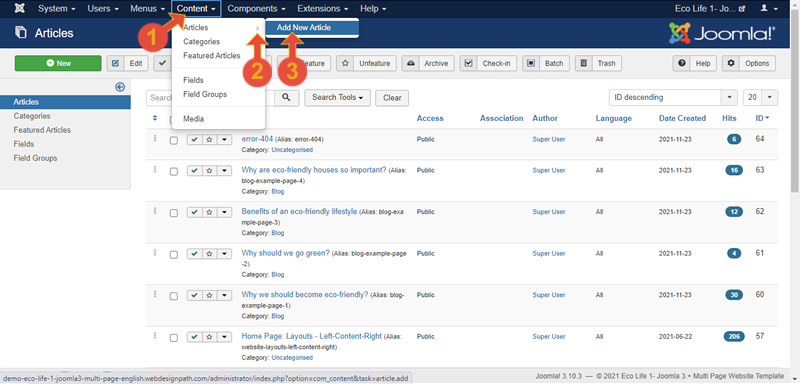
1. Go to Contents (1) -> Articles (2) -> Add New Article (3)
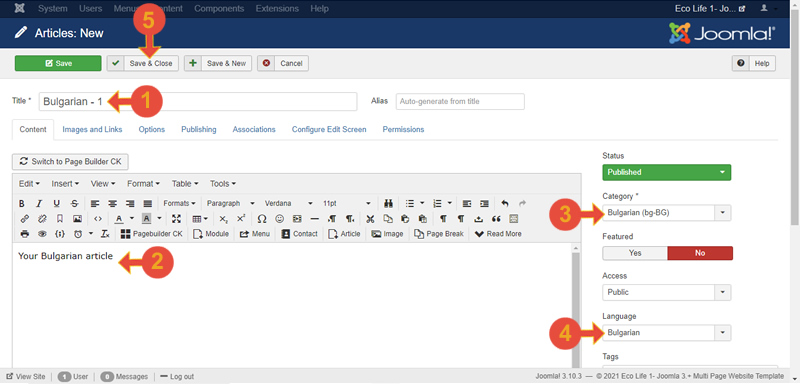
2. Put on the Title (1) and Content (2) in Bulgarian.
3. Choose a Category (3).
4. In the Language drop-down, change to Bulgarian (4).
5. Save & Close (5).
Repeat the above steps to create as many Articles as needed.
Step 5. Create Multilingual Menus
You have to create menus for each of the languages pointing to the articles.
1. Go to Menus (1) -> Manage (2) -> Add New menu (3)
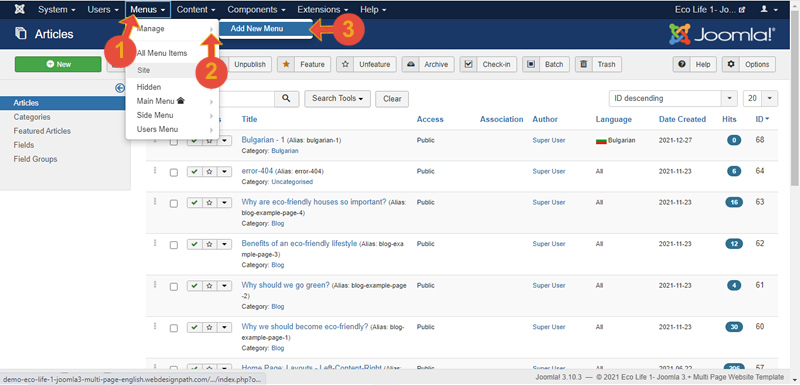
2. Put on Title (1), Menu Type (2) and click Save & Close (3).
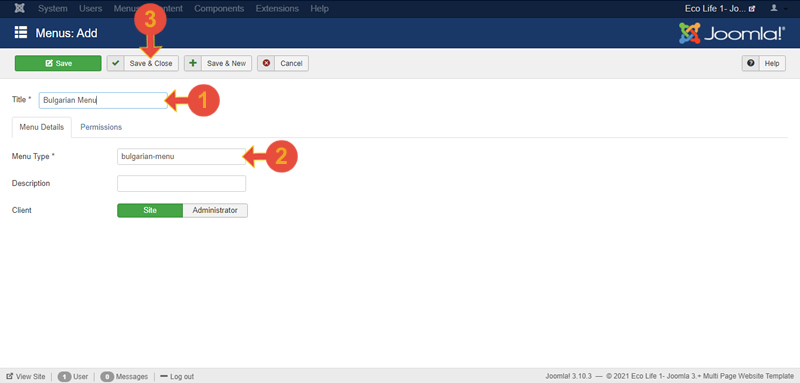
Repeat the above steps for the English menu.
5.1 Create new Menu items
We need to create new menu items for each newly created menus.
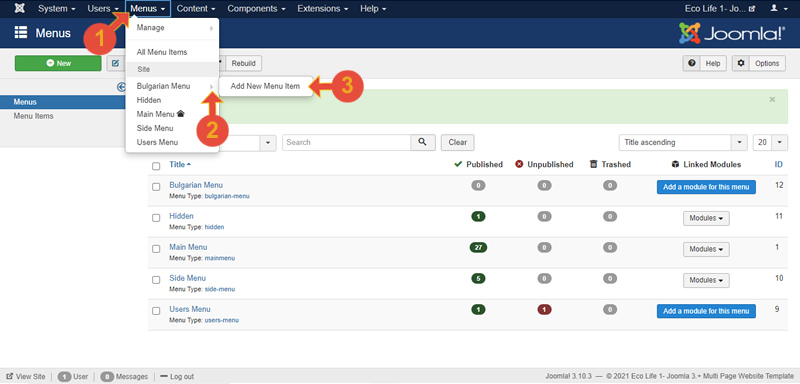
1. Go to Menus (1) -> Bulgarian Menu (2) -> Add New Menu Item (3)
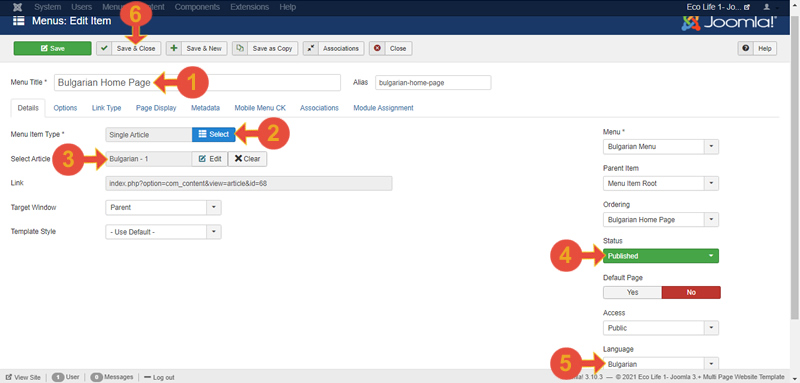
2. Put on Menu Title (1) and choose Single Article (2) type when selecting the Menu Item Type.
3. Select Article to display (3).
4. In the Status drop-down, make sure that the published option is selected.
5. In the Language drop-down, change the option to Bulgarian.
6. Click on Save & Close.
Repeat the above steps for the other menu items under the English menu.
5.2 Assign language-specific homepages to the new menus
Navigate to Menus (1) -> Bulgarian Menu (2)
2. Set the article as a default home page (3) by clicking the star icon.
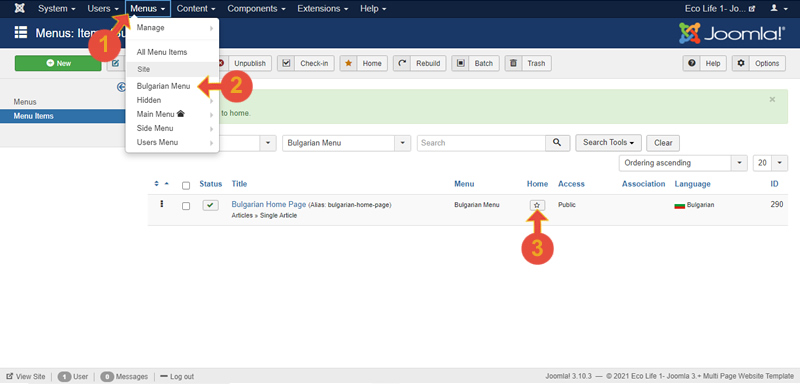
Do the same with the English menu.
5.3. Display on the front-end
1. Go to Menus (1) -> Manage (2).
2. Click on the "Add a module for this menu" button (3) to assign a module for the Bulgarian menu.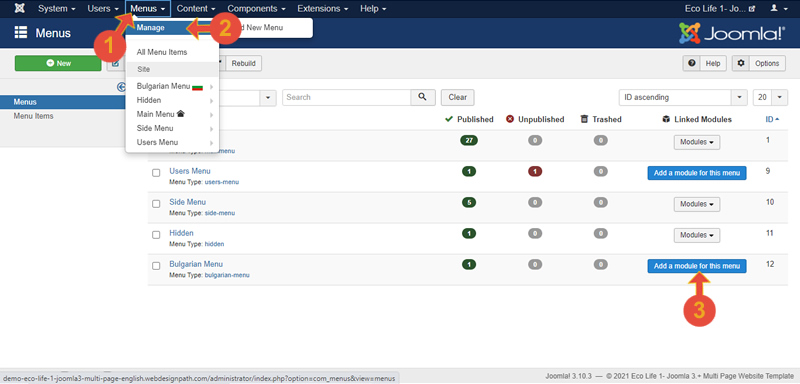
On the module setting window
3. Fill in the title field (1).
4. Select a menu (2).
5. Assign a position for the module (3).
In this demo, I choose a position "Menu" in the Eco-Life 1 template.
6. In the Language drop-down, select Bulgarian (4).
7. Click on Save & Close button(5).
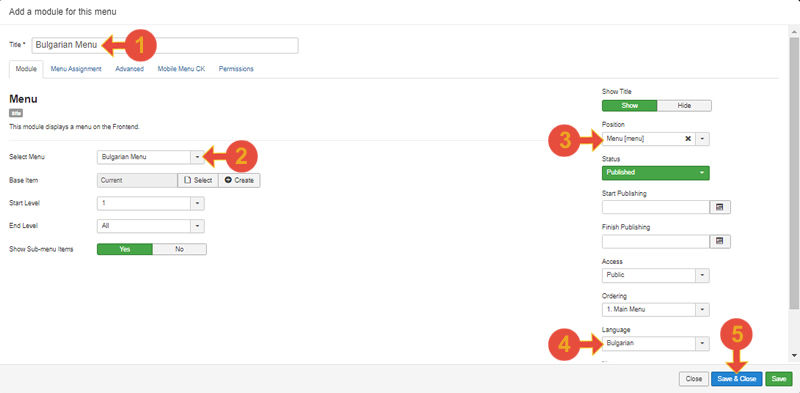
Repeat the above steps to display the English menu.
5.4. Make an association between 2 counterpart content
You have already enabled the "System - Language Filter" plugin and now you can make the associations. Making an associations you are enabling your Joomla CMS to change the content accordingly by switching the language.
You can make the associations on 3 levels: Menus, Categories and Articles. Here we will start with the menus.
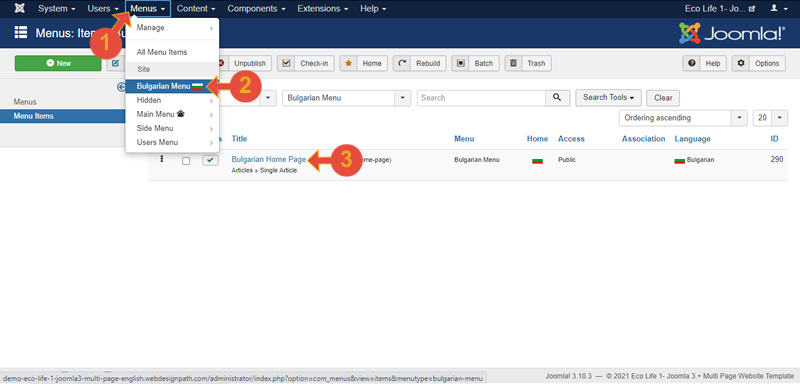
Go to Menus (1) -> Bulgarian Menu (2) and click the menu item (3).
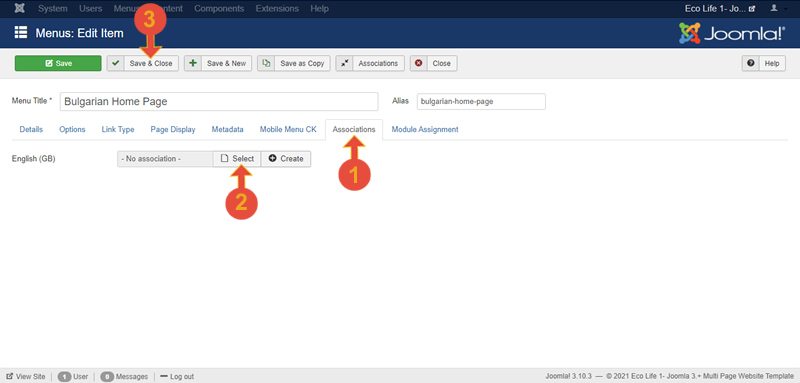
Click on the tab Associations (1) and Select (2) the appropriate menu item.
Save & Close (3) this menu item.
You will notice an EN text (1) on the association column in the Items listing page, which indicates that you have successfully associated your items.
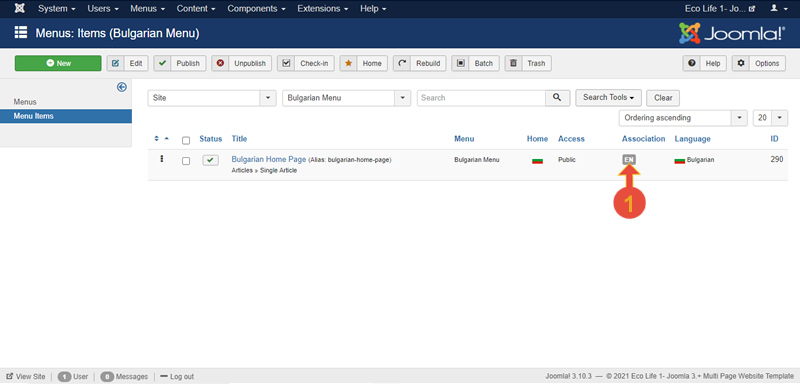
You can repeat the above steps with the rest of the menus, articles and categories.
Step 5. Create the Language Switcher module
By creating the language switcher module, you will generate a small country flag buttons for the front-end
which is the way for your users to select their preferred language.
1. Go to Extensions (1) -> Modules (2) and click on the button New (3)
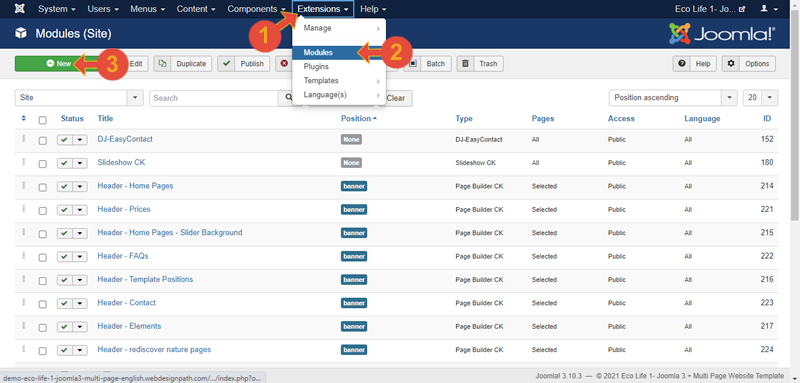
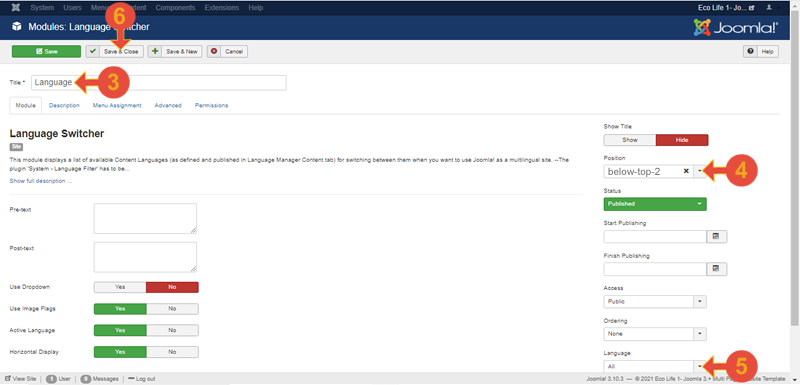
2. Select Language Switcher as module type.
3. Enter a Title: Language.
4. Assign module position for the module.
5. Select Language: All.
6. Save & Close.
Step 6. Duplicate your template for each language
Duplicating template allows you to have different menus, settings and styles according to each language.
1. Navigate to Extensions (1) -> Templates (2) -> Styles (3).
2. Select your default template (4) and click on the Duplicate (5) button.
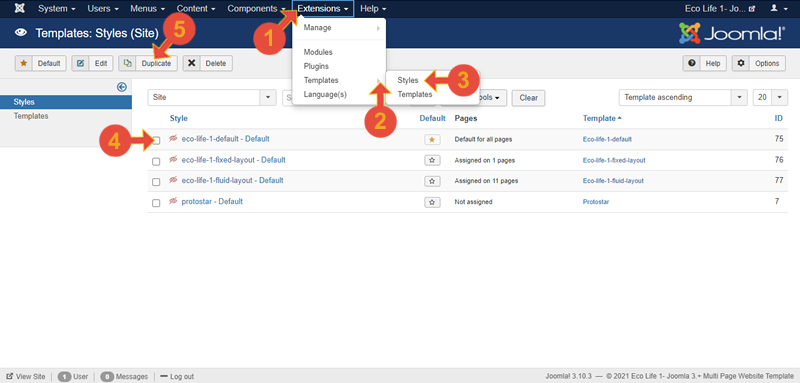
3. Click to open and Rename (6) the new template to your preferences. Save & Close (7).
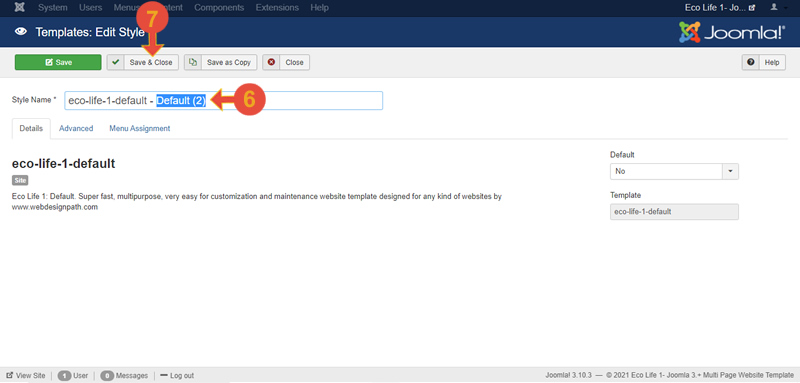
Edit the duplicated template and change the details according to the language. You can assign the language-specific menu and, depending of the template you’re using, you can assign a language to the override and much more.
Repeat the above steps for all the languages.
Step 7. Done
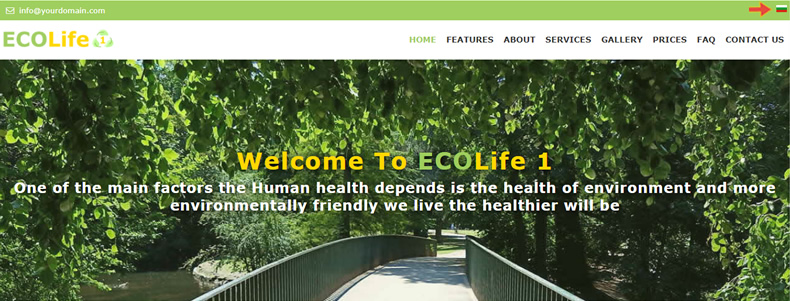
If you have followed all the above steps you will see the language switch in the upper right corner as in the image below.
