How to use Simple Image Gallery Plugin
Create an image gallery for your website
In some cases, you may want to have an image gallery in your website. The quickest and easiest way to do this is using ready-made solutions such as Simple Image Gallery.
About
Simple Image Gallery utilizes the jQuery based "fancyBox" modal script which generates very nice popups that display the images providing many features such as sharing, full screen images, etc.
Requirements
In order for Simple Image Gallery to function properly, you need at least PHP 4 and PHP's GD image library installed on your server. Make sure that Joomla's /cache folder is writable, i.e. check that the permissions for the folder are 755 or 777.
Installing Simple Image Gallery
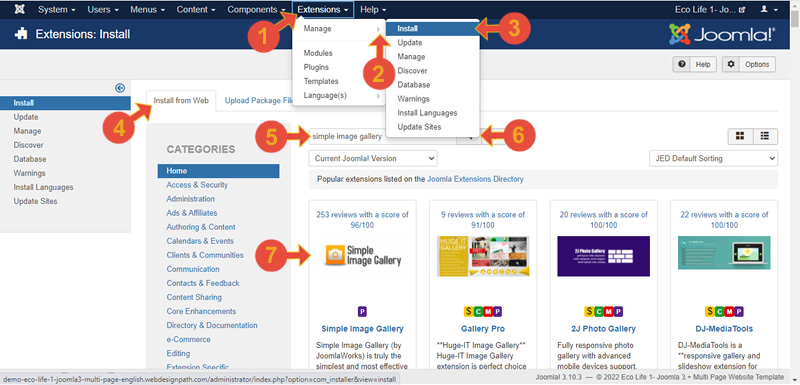
In Joomla administrator panel navigate to: (1) Extensions -> (2) Manage -> (3) Install -> (4) Click on "Install from Web" tab -> (5) Write "Simple Image Gallery" in the search field - > (6) Click on the search button -> (7) Click on the Simple Image Gallery plugin made by JoomlaWorks.
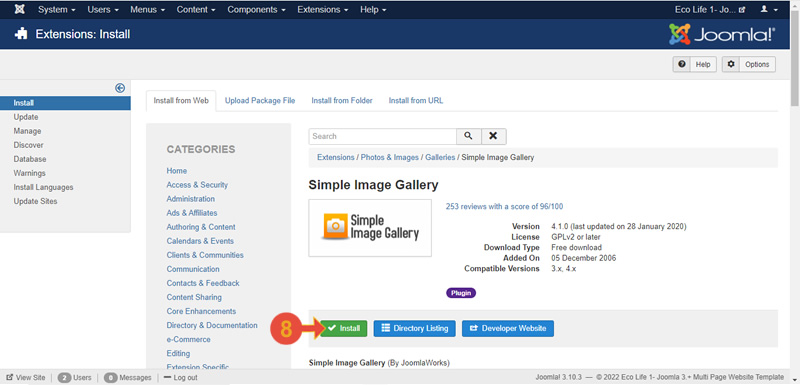
(8) Click on the Install button.
To enable and edit the plugin parameters, navigate to Extensions -> Plugin Manager.
Prepare your images
Large image files use a lot of hosting space and can make the website running slow, leading to frustrated visitors leaving your site so resizing the large images before uploading to a website is a good practise. To resize your images you can use free software solutions such as GIMP or Paint.NET. Usually, your image files should have dimensions of no more than 1024 pixels in width for landscape imags or height for portrait images.
The images should be saved at no more than 60%-80% quality which will reduce the file sizes. It is recommended that the file size of an image to be no bigger than 80Kb.
Make sure that your images have meaningful names i.e. if you have a photo of sunset, it would be a good idea to name it "image-of-sunset".
How it works
1. Create a new gallery folder where you will upload the images.
2. Set the "Root folder" (the newly created gallery folder) for all galleries in the extension's settings.
3. Transfer your images to the gallery folder on your server.
How to upgrade the extension
The upgrading process is the same as installing the extension for the first time i.e. simply upload the newer version on top of the previous one and the new features will be added automatically keeping the old settings unchanged.
Template Customizations
You can customize your gallery layout simply using HTML and CSS template overrides inside your Joomla Template and change the way of displaying your image gallery. To override both the HTML and CSS code:
1. Copy the plugin's folder "tmpl" from /plugins/content/ jw_sig/jw_sig/tmpl to your Joomla template's directory /templates/ YOURTEMPLATE/html and rename that folder "tmpl" to "jw_sig".
2. Override the files from the template folder, as you can with any MVC component or module.


